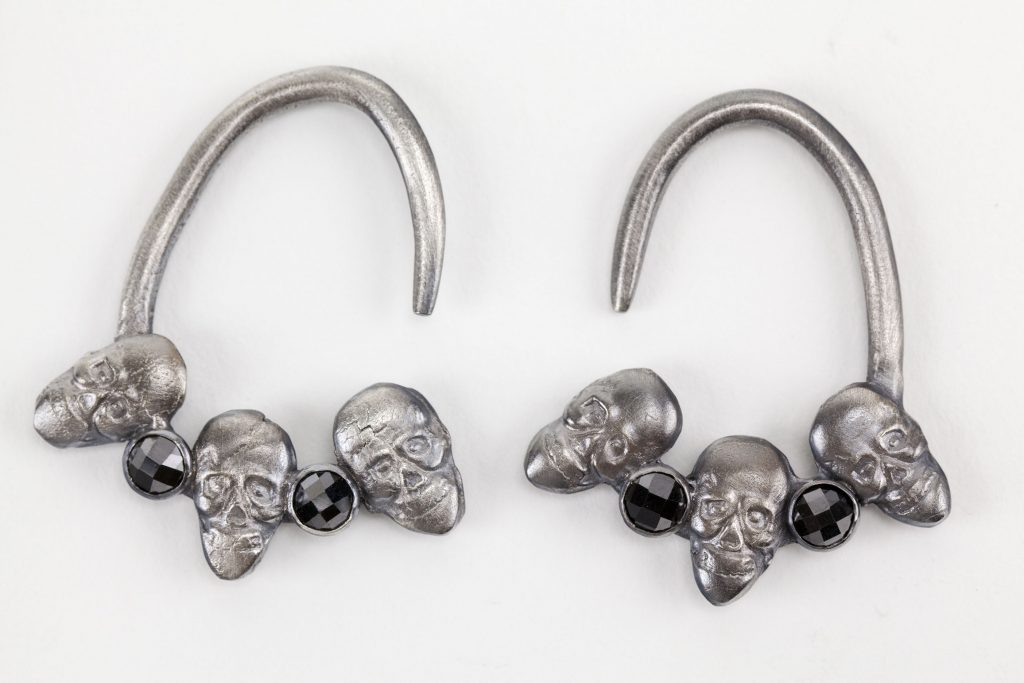
It’s Friday the 13th! The perfect day to learn from Annie Kilborn on how to create these unique Skulls Earrings! These earrings are Annie’s FIRST metal clay project she has done.
Materials:
FS999™ Fine Silver Clay
Cubic Zirconia – Jet Black – Cabochon Round – Checkerboard – 6mm (2 Packs)
Fine Silver Bezel Cup – Plain Round 6mm
Cool Tools Patina Gel – Live of Sulfur in Gel Form
Tools:
Antique Mold – Toxic
Makin’s Professional Ultimate Clay Extruder
Bezel Roller
Curved Burnisher – Slim
Tuff Cards Teflon Project Cards
Cool Tools Clayboard Non-stick Work Surface 9″ x 9″
Cool Slip Anti-Stick Solution
Cool Tools Clay Thickness Rolling Frames
Ultimate Non-Stick Roller – 11″ Length
Making the Skulls:
Roll out a slab of FS999™ Fine Silver clay 4 cards thick. Lightly cover the Antique Mold “Toxic,” a skull and crossbones image with the Cool Slip. Gently press the slab into the Antique Mold. You will just use the skull area of the mold, so the excess clay can be cut away and used for the next skull pressing. Before removing the skull from the mold, let the clay set dry slightly so it will keep its shape and not distort when removing from the mold. Once removed from the mold, take the extra clay off from around the skull area. Allow it to dry. You will need to make six skulls. Once they are dry refine by sanding the edges and sanding flat spots on the back.
Making Earring Wires:
This pair of earrings was created for a stretched ear. Use the Makin’s Professional Ultimate Clay Extruder with a round template to get a long coil for the earring wires. Make a template on a piece of paper of the shape that you want the earring wire to take. Include the area in which the skulls and stones will be placed. The backside of these pieces will attach to the wire. Next, take the coil and form it to the shape created on the paper. Then repeat, so you have the same shape wire for both earrings. Let them dry. Once they are dry, taper one of the ends of both wires. This will be the end that feeds through the ear. Sand down a flat spot on the wire where the skulls and stones will attach.
Making the Settings for the Stones:
Get four 6mm Fine Silver Bezels Cups and four 6mm Jet Black Cubic Zirconia Round Cabochons with the Checkerboard pattern. Sand down the tops of the bezel cups to fit the stones. Once you have a good fit, set the stones in the cups using a bezel roller to rock over the walls of the cup to hold the stone. Then use a curved burnisher to smooth out the sides of the bezel once the stone is set. Rough up the back of the bezel cups so that you will get a good bond to the clay when firing.
Assembling the Elements:
Create a clay slip by adding water to a small amount of the FS999 fine silver clay. Lightly, brush on some water to the dried skulls and wire where you want them to join. Add slip to both parts where they will connect. Then connect with gentle pressure. Add the stones by adding slip to the back of the bezels and join to the slipped area of the wire. Repeat until all the skulls and gems are attached to the wire. Allow to dry. Once it is dry, do all final sanding and refining. Once refined fire following the firing directions for FS999 fine silver clay.
Surface Finishing Techniques:
Once the earrings are fired and have cooled, clean with a brass brush, soap and water. Once they are clean, tumble them. After tumbling, patina with Cool Tools Patina Gel to a dark black patina. Then buff back the patina to reveal the wonderful detail in the earrings.
